

How to Write a Blog Post (2021)
How to Write a Blog Post (2021)
Writing a blog post: A full rundown of how we’re doing at Buffer.

In my experience, one of the best ways to write great content is to take the time to write great content.
I’m grateful that Buffer’s team highlights the blog as a means of helping others, spreading the word about Buffer, and sharing our lessons and improvements. This allows me to spend my time writing.
And how do I spend that time?
I’d love to show you.
We publish four posts per week on the Buffer blog, each post at least 1,500 words (and typically more than 2,000). I am writing three of these messages. And for the past two weeks, I’ve tracked every minute I spent on a blog post, from research to promotion. Here’s how it all breaks.
How much time does it take
to write a Buffer blog post I write a Buffer blog post on average in 2 hours and 58 minutes.
The longest post took 3 hours and 33 minutes.
The shortest post took 2 hours and 23 minutes.
The post I’m writing now lasted 2 hours and 42 minutes (I added it all up when I finished).
In total I kept six different blog posts. Here’s a breakdown of the word count and time spent on each of the six messages from the past two weeks.

The times were really interesting to watch as they’ve improved a lot since I started Buffer. Just like Belle’s post on how she cut her writing time from 2 days to 4 hours, I would say my writing time has also decreased significantly.
I used to spend 8 to 12 hours in the mail. It’s amazing to see how that time has shrunk now that I’ve gained experience and confidence writing for the Buffer blog.
How I spend my time writing blog posts.
From a bird’s eye view, here’s a brief overview of how the three hours break up specifically, according to the different stages of my writing process. I would like to go into more detail on each of these stages below.
And a tip of the hat to the free time tracking tool Toggl , which allows me to easily track and compile all of these stats.
Research – 40 minutes per post
One of the hallmarks of the blog posts on the Buffer blog is the fact that they are research-backed, scientific, data-oriented articles with specific, actionable takeaways.
That’s why it’s important to spend as much time as possible coming up with research, science, and data to share.
My research process has sped up quite a bit as I gained experience with social media and the Buffer way of things. I can draw on the past to write good chunks of articles now, with less switching back and forth between old articles and old discussions.
To quickly find an article we wrote about in the past, I do a site: search in Google.
site: buffer.com/library keyword feed
click to share
To find sources to quote and dig for social media statistics or strategies, I do a lot of custom Google searches both on google.com and at Google Scholar (tons of great research papers and scientific studies).
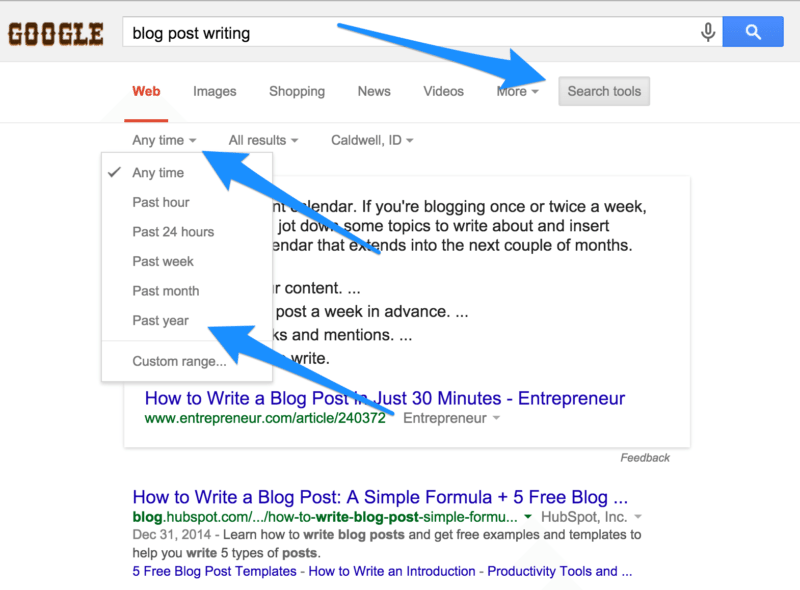
- I’ll start with a series of keywords, each of which is entered in a Google search.
- I’ll refine the search terms, based on automatic and suggested search suggestions at the bottom of the page.
- I change the date settings to only show results from the past year.
In addition to these workflows, I also find that a lot of research can be done before you even start researching a blog post.
Seems a bit counterintuitive, right? Well, the way this has worked at Buffer is that we collect and store all the interesting research in personal Evernote files or in our team’s Trello blog post board. I’ve used a method to flag and tag articles in Pocket, or indicate tweets that I might want to refer to later for information.
However you choose to do it, this pre-research phase can be a great time saver when it comes to starting a new blog post.
Overview – 4 minutes per post
Some posts – not all posts – go through a review phase where I take the research and organize it in a loose stream. It’s all very careful and guesswork; I expect the end product to change a lot from the original setup.
The outline is as simple as jotting down the sections I’m going to eventually write and the order in which I think they will appear, then moving the research, statistics, and quota tables to each section.
It helps to take things with you for the writing phase (next).
Writing – 59 minutes per post
WordPress used to have this cool Easter egg when you switched to the distraction-free editor. The bottom of the editor would say, “Just write.”

And this is such good advice. At this stage of my writing process, writing alone is the most valuable thing I can do. I shut everything down, jump into the distraction-free WordPress editor, and let whatever comes to mind fly.
I always write the intro first, as it helps me focus on where the article is going and makes it a bit easier psychologically to stick with writing the post as I’m not working from a completely blank page.
As I write, I’ll keep things in mind like:
- Varying sentence length
- Varying paragraph size Add
- space for images (I use a text placeholder of “// pic”)
- Reminders to come back and add statistics or details ( I’m leaving an “xx” for missing info)
And otherwise there’s not much else I’ll do. Just write. Even if it’s awful. (Awful is better than nothing.)
By the end of the writing phase, I often have 2,000 or more words to work with.
Edit – 26 minutes per post.
I give myself the freedom to throw in a lot of ideas, thoughts and wanderings during the writing phase because I know the editing phase is coming. I get the chance to do things to clean upWriting:.
and seems editing in many ways quote on Part II There are times that much of what I have previously written clipped and completely restart doo..
and to edit one of the easiest ways, r give the item some time to simmer, a few hours or rather a day. If I can come back to something with a fresh look, I can often see things from a better perspective.
During the actual editing process, I’ll do the following:
- Tighten the intro and make sure it has a copywriting formula or parenthesis. Double check that
- headlines are descriptive and noticeable Double
- check that headlines are the correct size (in our case, H2 vs H3 vs bold)
- Add links to previous Buffer articles in the intro and throughout the story where applicable.
- Add missing information such as statistics or source attribution
- Remove sections that do not add value to the article; trim of super long pieces
- , such as bold, italics, blockquote, dash, bullets, numbered lists
- Proofread
Image creation – 30 minutes per post
is studded with visuals gets 94 percent more views.BROUGHT to you
Try our full stack of it brand building tools
We’ve developed a full stack of social media tools to help modern brands increase awareness, engagement and sales.Start a 14-day free trial
. So we strive to be very focused in finding and creating great images for every message.
I usually find or create the following images for each new article:
- A title image created in Pablo, with the post’s keyword, a subhead, and an icon main image
- Duck that serves as the background for the article header
- Screenshots
- Pinterest- graphic dimensions, vertical and 735 x 1102
- Various images, if needed
For creating all these cool stuff, I found a pretty solid list of tools and websites. These are the ones I visit most often:
- Pablo, for
- Canva, for various Pinterest sized images and images
- titleand, for annotated screenshots
- Cloud app, for animated GIFs
- Compressor.io images images, for compressing large images into smaller file sizes
- quoteSkitchIconFinder and The Noun Project, for icons
- UnSplash Countless and Death to the Stock Photo, for free images (there are other great, free image sources too)
Very soon, here’s an example of what I do when creating the blog post title image. I’ve cut this down to about two minutes.
- Enter the heading, set the heading to Open Sans font, Extra large, Bold
- Click to add secondary text, set the text to Satisfy font, Large
- Find an image on UnSplash, abstract but maybe somewhat related to the post e.g. A car dashboard for a post about statistics or an airplane for a post about growth
- Upload the image, set it to Fade
- Find an icon on IconFinder, set the search to Flat icons only
- Download the icon and upload it to Pablo as the “Add a logo” option, resize as needed
- Center all elements
- Download to my computer

SEO – 4 minutes per blog post
For SEO, much of it comes up early in our blogging process. In fact, it often happens before the process even begins.
The idea phase is sometimes the best time to think about the keyword you are going to focus on in the story. If you have a keyword in mind from the start, the SEO part of the writing process is going to be pretty quick.
In the past two weeks, I’ve had the privilege of writing posts with clear keywords such as ‘content promotion’, ‘collaboration tools’ and ‘social media checklist’.
There are, of course, times when the keyword isn’t that crystal clear. If I’m in doubt about the keyword to focus on, I’ll do a quick Google search.
I go to trends.google.com and type in the keywords I’m considering. Here’s what Google Trends had to say about this post on how to spend your time writing a blog post.

Another method is also to open an incognito browser window, go to Google and type potential keywords and notice the Autofill results that appear.

For the Buffer blog, we use a WordPress plugin, Yoast SEO, to handle the specific aspects of implementing the SEO strategy in each post, leaving us with just a few small tasks to do for each post to set the SEO.
- Choose a focus keyword
- Write an SEO headline – used on Google, Facebook, etc.
- Write a description
- Edit the article URL

From time to time, to make sure the content is targeted to that keyword or phrase I quickly search it article (CTRL + F) to see how often the keyword is mentioned or to rewrite any phrases that may be similar.
Headlines – 6 minutes per post
Recently I started an attempt at some sort of Upworthy headline challenge.
Upworthy’s writers write 25 headlines for each post, then pick the best from the list to share on social media and test as the winning headline.
I’ve been able to make 15 headlines in the post so far, and it was really great exercise.
What may have helped me the most with this is that I can refer to a few articles on the Buffer blog that are about headlines:
- Ultimate Headline Formulas
- Headline Strategies and the Psychology Behind Them.
Having this close by is very useful for brainstorming the different headline options, and it has helped me expand my creativity and openness to new headline ideas.
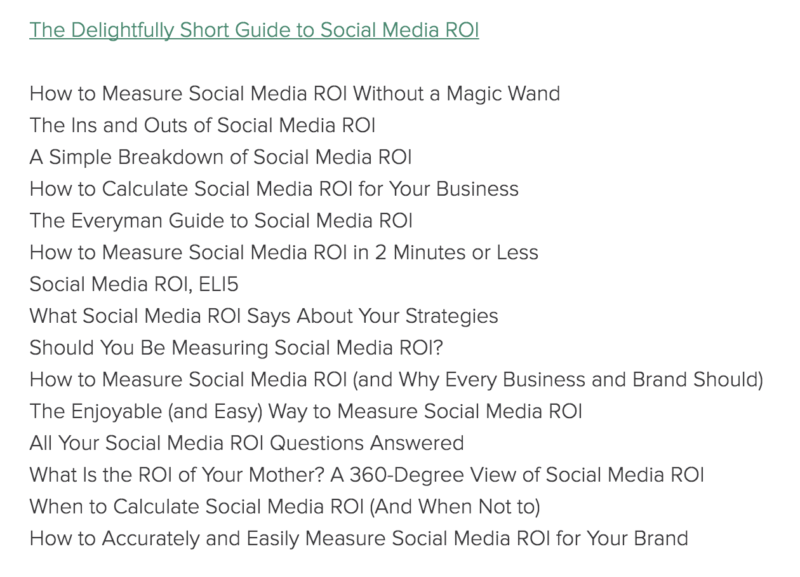
And not all heads are winners! (In my experience so far, about 1/3 of them may be worth keeping.) For example, here’s the list of headlines I brainstormed for the post that ended up titled The Delightfully Short Guide to Social Media ROI.
Promotion – 7 Minutes Per Post
There are so many cool tips and techniques for promoting your content. I would like to explore much further; at this stage, we’re just doing a few things for Buffer blog posts.
What I’ll do is share each new post multiple times on social media, following a sharing schedule we’ve repeated here at Buffer: multiple times on Twitter for the first few days, once today, and once later in the week on Facebook and Google+ , once on LinkedIn.

And then every new post also goes to our RSS email list (you can sign up here if you’re interested). And this process happens automatically. Each new mail is picked up by MailChimp and shipped at 10:00 AM Pacific Time.
How My Process Has Changed Over Time
One thing I have found about my writing process is that it seems to change routinely.
Things happen during the week that allow me to tweak the schedule and I’ll run into a new writing system – and keep that system until a new one falls into place.
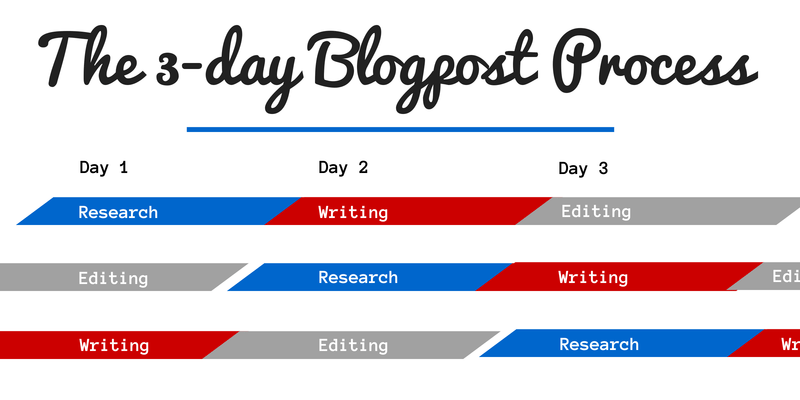
I especially loved one system I used when I started at Buffer: the three-day blog post process. It worked like this:
- Day One: Research
- Day Two: Writing
- Day Three: Editing
And the idea is to stagger the schedule so that you do one of each stage each day for three different blog posts.
This way, I was able to write up to five blog posts a week and felt great about the extra time to focus on and think about the content I published.
(My schedule has shifted slightly to more of a one-day writing method, where I finish most of it in one day and then read it one last time on the day of publication.)


No comments: